Short production run of specialty hardware with turned aluminum spacers, angled and slotted aluminum brackets, and custom machined and TIG welded stainless steel studs with low profile star shaped handles, there's also a welded stainless flag nut to hold the whole thing together. Pretty fun project, definitely not something you'll find at a hardware store.
Short run of custom stainless and aluminum hardware.
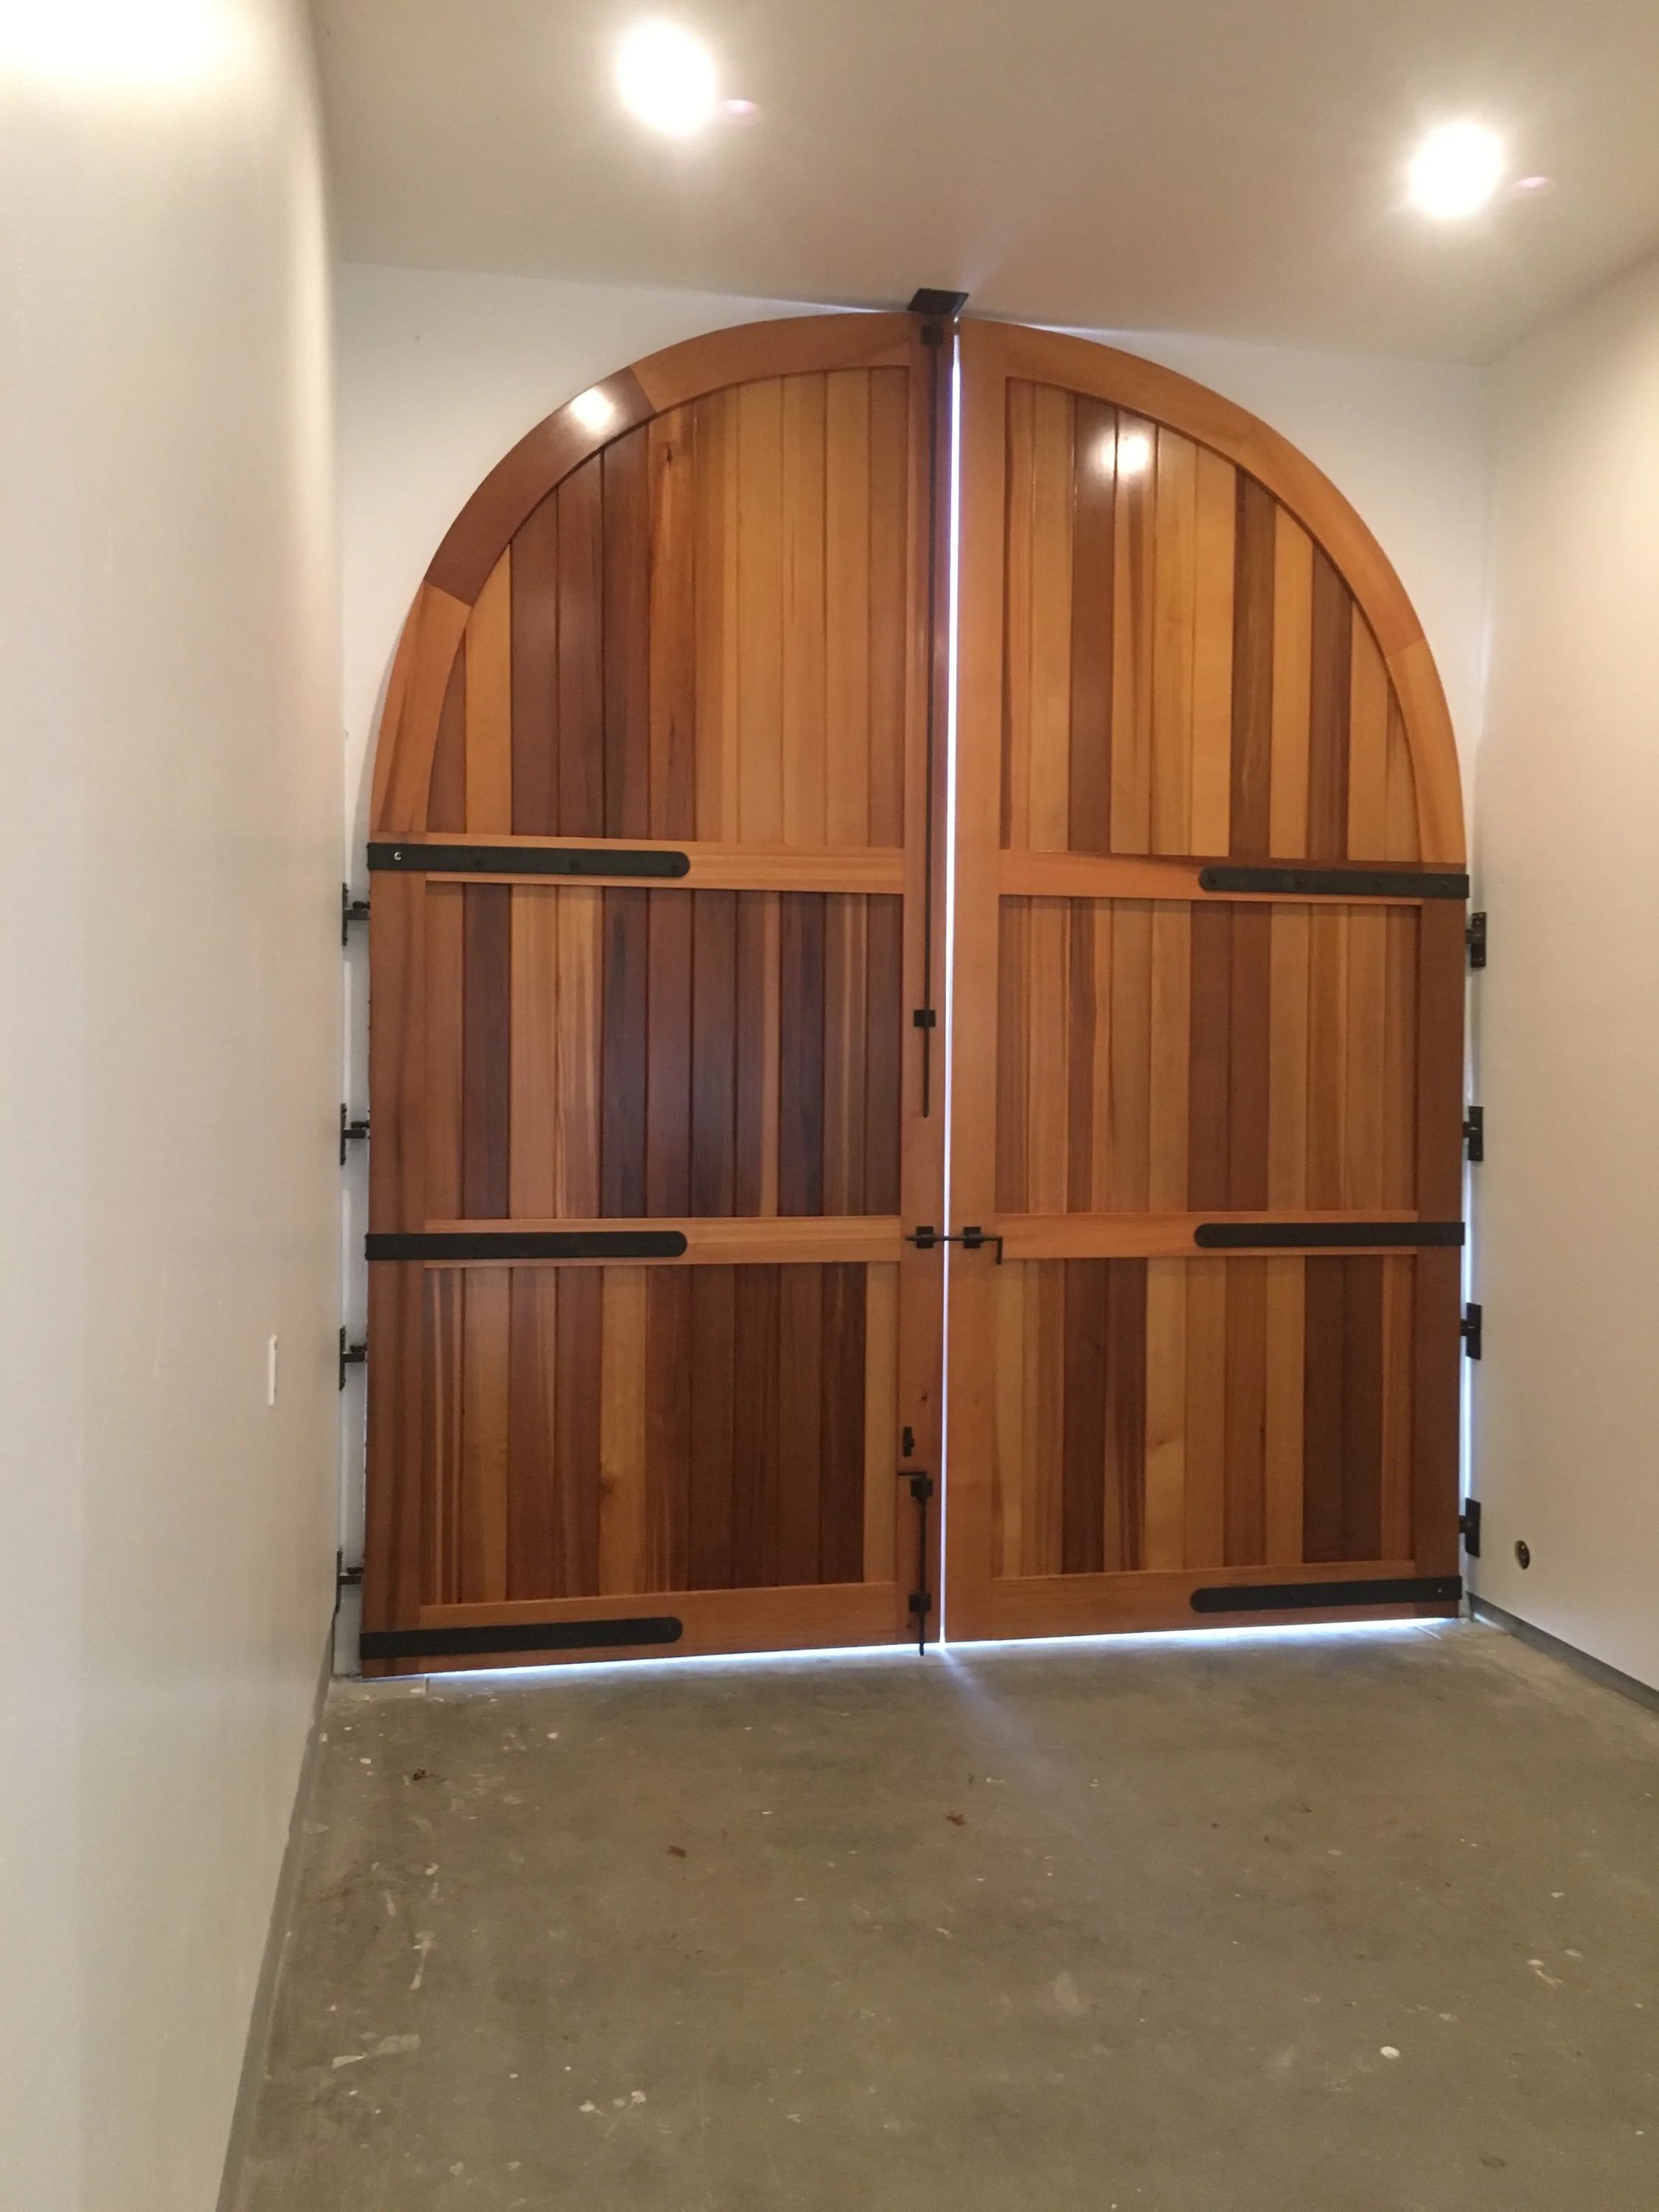
We made these very stout hinges for our friends at Williams Gate Works for a pair of giant garage doors they were commissioned to build. We quickly started calling them castle doors because of their shape and size. We made these hinges out of 304 stainless steel with a black patina and protective clear coat. The black patina gives the hinges the understated look of black steel or iron but with the rust resistance and additional stregth of stainless steel.
Some of the black patinaed stainless hardware, all of the latches ride on custom black Delrin bushings.
Close up of the black patina on one of the hinges, the 1/2" x 3" stainless steel bar on the right was set into the wood doors and is not visible once the doors are installed.
The doors from inside the garage, Shannon at Williams Gate Works really knows how to make beautiful doors. The hinges pivot off center to allow the doors to open completely flat against the interior walls.
Here's the exterior of the Cedar doors with Shannon Williams standing in front of them to give a sense of just how large these doors are.
We built this heart sculpture for Robin Stockwell at Succulent Gardens in Castroville Ca. The heart was commissioned for the 2015 Northwest Flower and Garden Show in Seattle. The heart stands 14 feet high on it's stand and is 12 feet across. The metal work was completed and delivered to Succulent Gardens in late in 2014, it was then planted with 15,000 succulents and allowed to grow before being transported to Seattle to be displayed at the garden show.
Heart sculpture setup for display at the Northwest Flower and Garden show in Seattle WA
The heart was built in two halves that are bolted together on site, this allowed the heart to fit in a standard climate controlled semi-trailer for shipping. The heart structure is moved back as far as possible from the plant growing surface to allow the plants more room to grow.
The backbone structure of the heart halves being welded while bolted together to ensure the heart halves will match once they are completed
The ribs for each half of the heart sculpture were bent in one piece to ensure the curves were consistent on each half of the heart.
The curved ribs in welded in position as well as the outer edge shape, the edge on the right is the seam where the two halves will be bolted together.
The surface of the heart is expanded metal shaped to fit the curves of the thin supporting ribs. We used the ribs as a template while shrinking and stretching the curves into the expanded metal, it was then carefully welded onto the ribs and the outer edge.
Shaping the expanded metal surface
The back of the heart is made up of several flat expanded metal panels, the panels are removable to facilitate planting the 15,000 succulents.
Metal work being done on the back panels of the heart, nutserts and stainless steel hardware secure the panels.
Matt Geary with one half of the heart painted red, the heart is sitting on a simple cart we made so the nursery could easily move the heart during the planting and growing period and to simplify shipping.
After allowing the 15,000 succulents to grow the heart and it's stand are up in Seattle at the Northwest Flower and Garden show. Now we just need to assemble all the pieces.
Working on the installation of the heart onto its stand in Seattle
We made three of these cabinets out of 304 Stainless Steel for a commercial food production facility. The cabinets are TIG welded and their exterior is sheathed in Acrylic sheet (Plexiglas).
One of three custom Stainless Steel Food Production Cabinets. These cabinets are designed to hold 1050 pounds each. It's hard to see the Acrylic sheathing in this photo it's so clear.
Custom food grade Stainless Steel cabinet with the protective plastic still on the acrylic (much easier to see the acrylic in this photo.)
Matt lining up to drill one of the many, many holes required in the Plexiglas sheathing for the three cabinets.
This is one half of the Moxon Claw ham radio bracket installed on the bracket made earlier (see part #1). The pair of brackets are designed and fabricated to provide a precise angle to the four masts that attach to them. The brackets are stainless steel and have been painted to make them less visible to the neighbors.
Here is the complete Moxon Claw antenna mocked up on the ground before being installed on the roof.
This was a really fun project. The customer wanted a new dodger frameand a bimini for his sailboat. He didn't want to go with a traditional bimini design, which typically has a multitude of stainless steel tubing supports that tend to break up the clean lines of the boat as well as obstruct the view from the cockpit.
Our solution was to build a floating bimini. The forward bimini supports are built into the dodger frame handrails, a custom fitting attaches the rear of the bimini to the mizzen mast, this is wrap around stainless steel band that attaches without the need for drilling any holes in the mast. Additionally two machined fittings welded to the bimini frame attach to the mizzen shrouds to add rotational stability to the rear. The bimini breaks down into three separate sections via custom stainless quick releases.
The bimini shape is matched to the shape of the cockpit with a camber to compliment the dodger and deck camber. The forward edge of the bimini slopes down to allow clearance for the main boom when the boom is at sailing height.
The end result is a very clean look with greatly improved functionality over traditional designs
This pic shows the wrap around for the mizzen mast, without the mizzen wrap around the aft end of the cockpit would not be covered by the bimini
The bimini breaks down into three easily manageable sections using custom stainless steel quick releases
A view from the inside of the cockpit, I'm really happy with the clean uncluttered look
The front of the bimini slopes to match the main boom
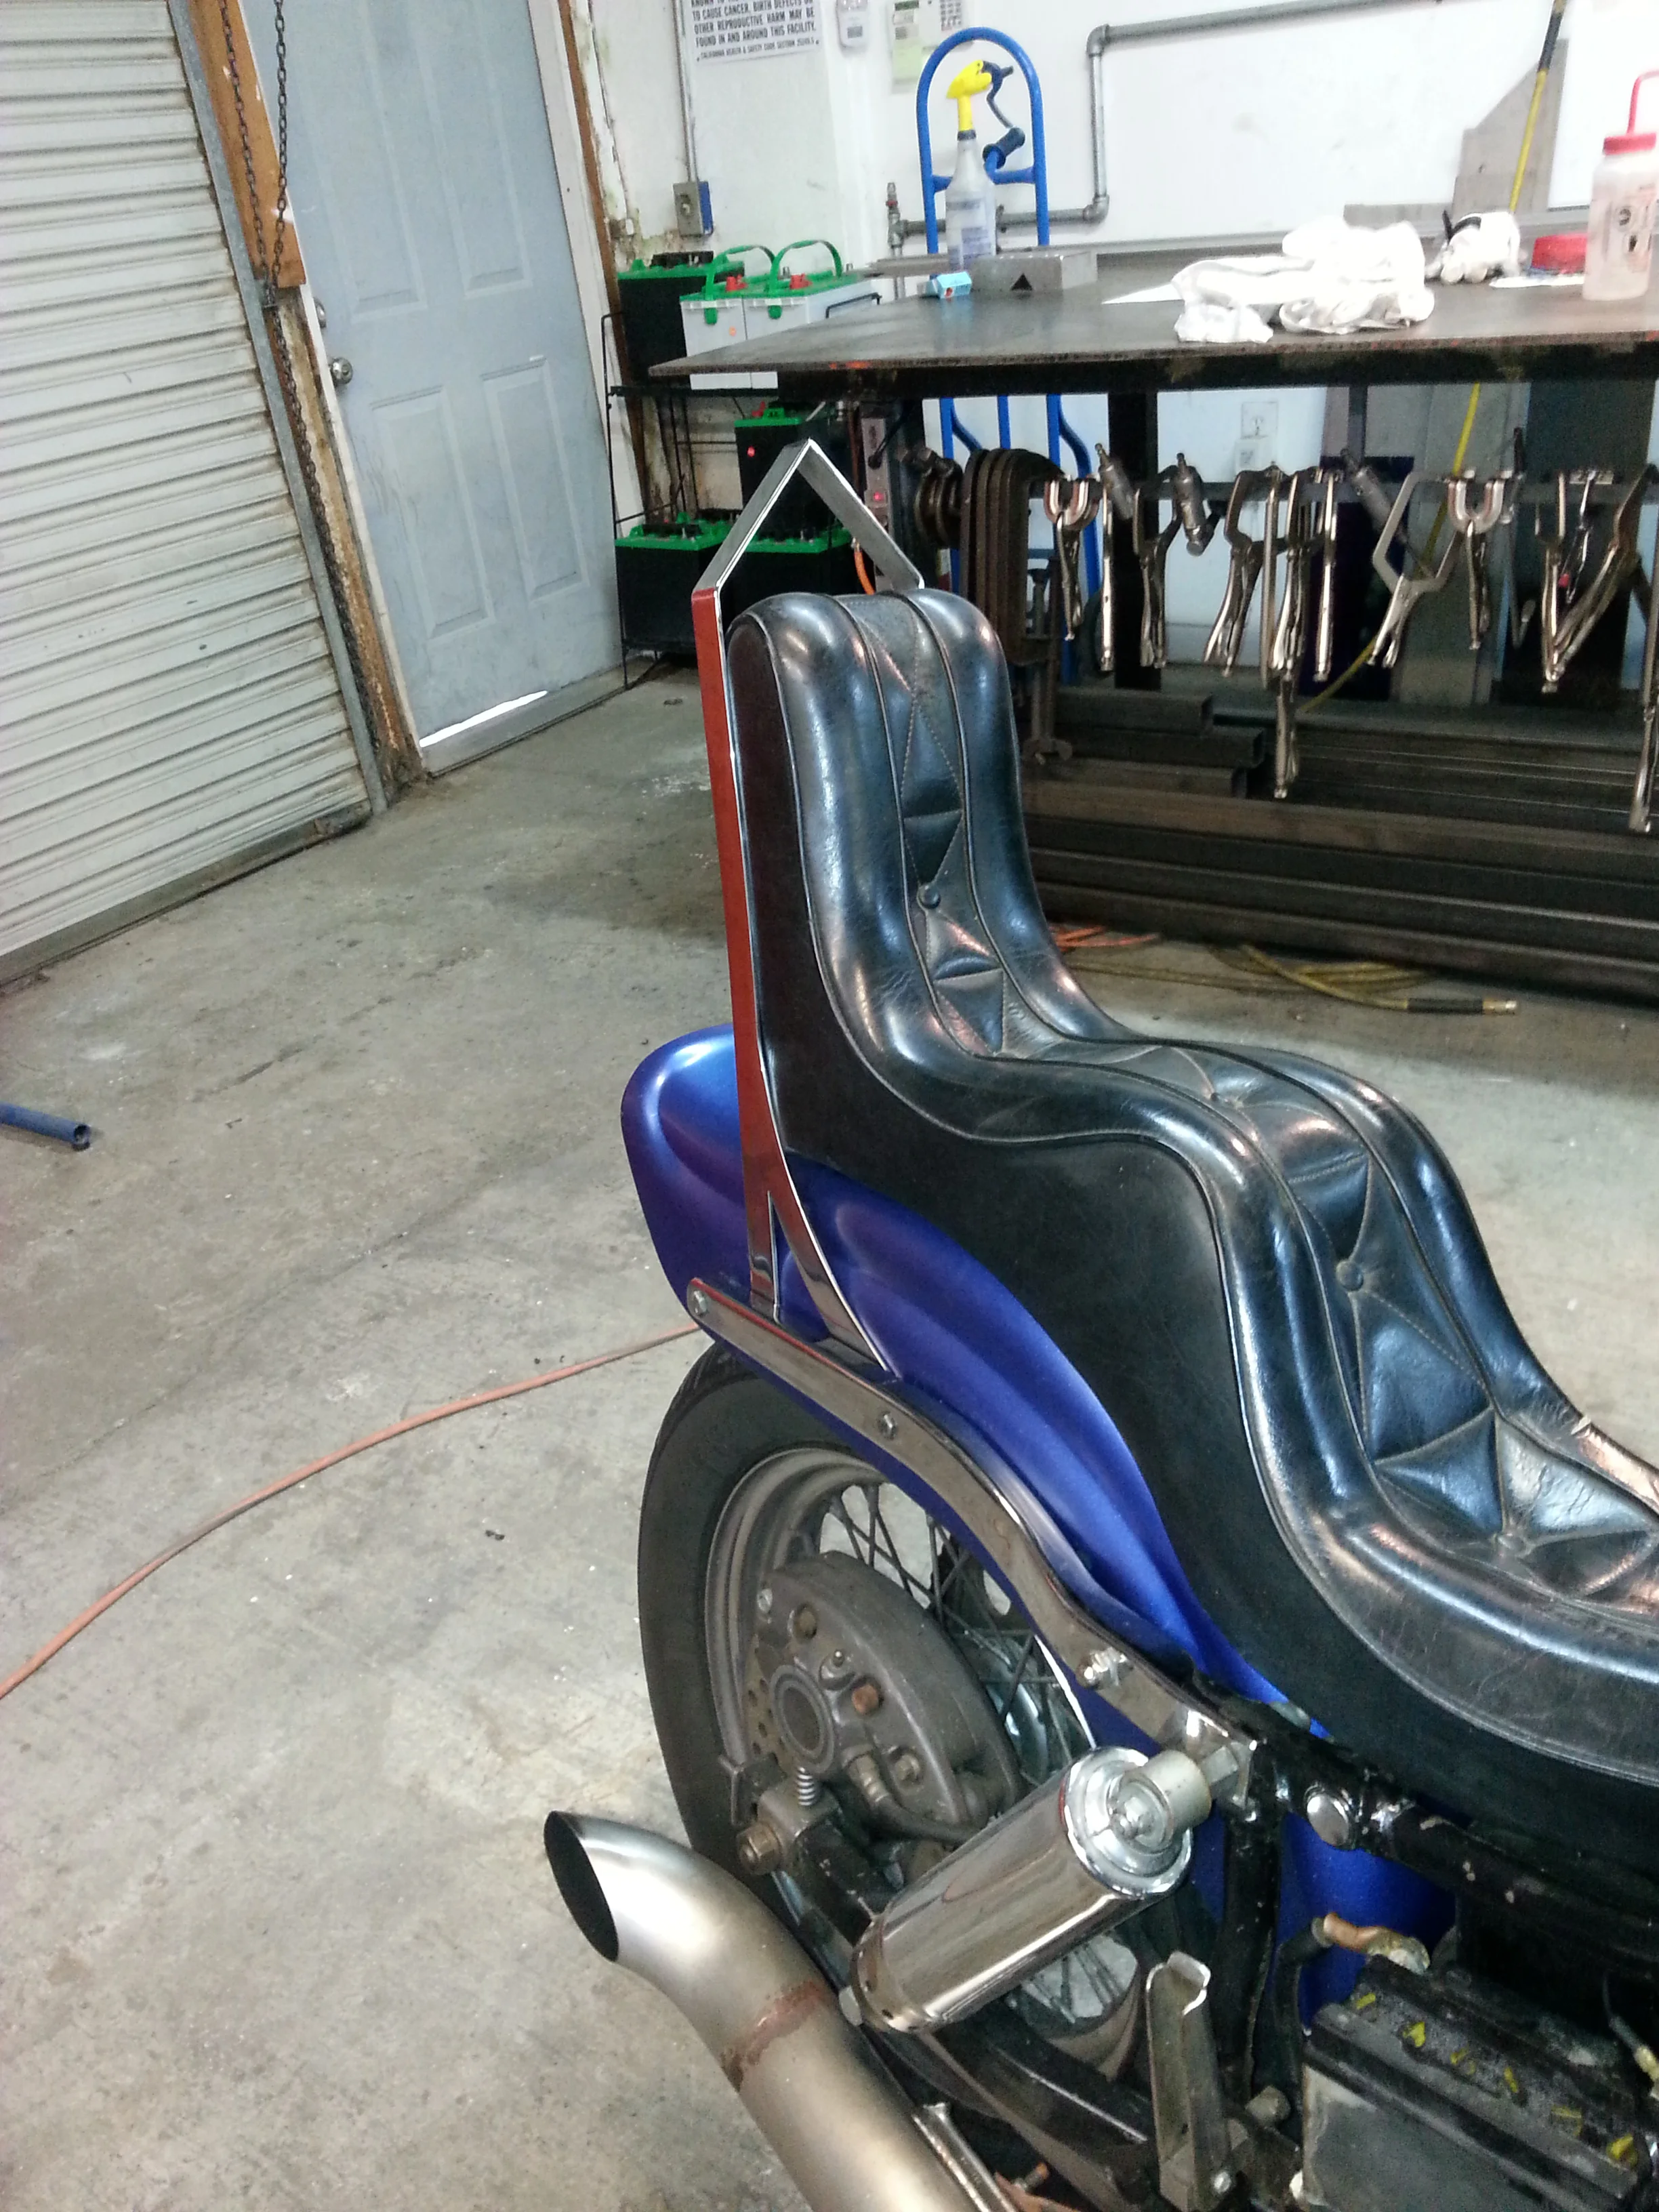
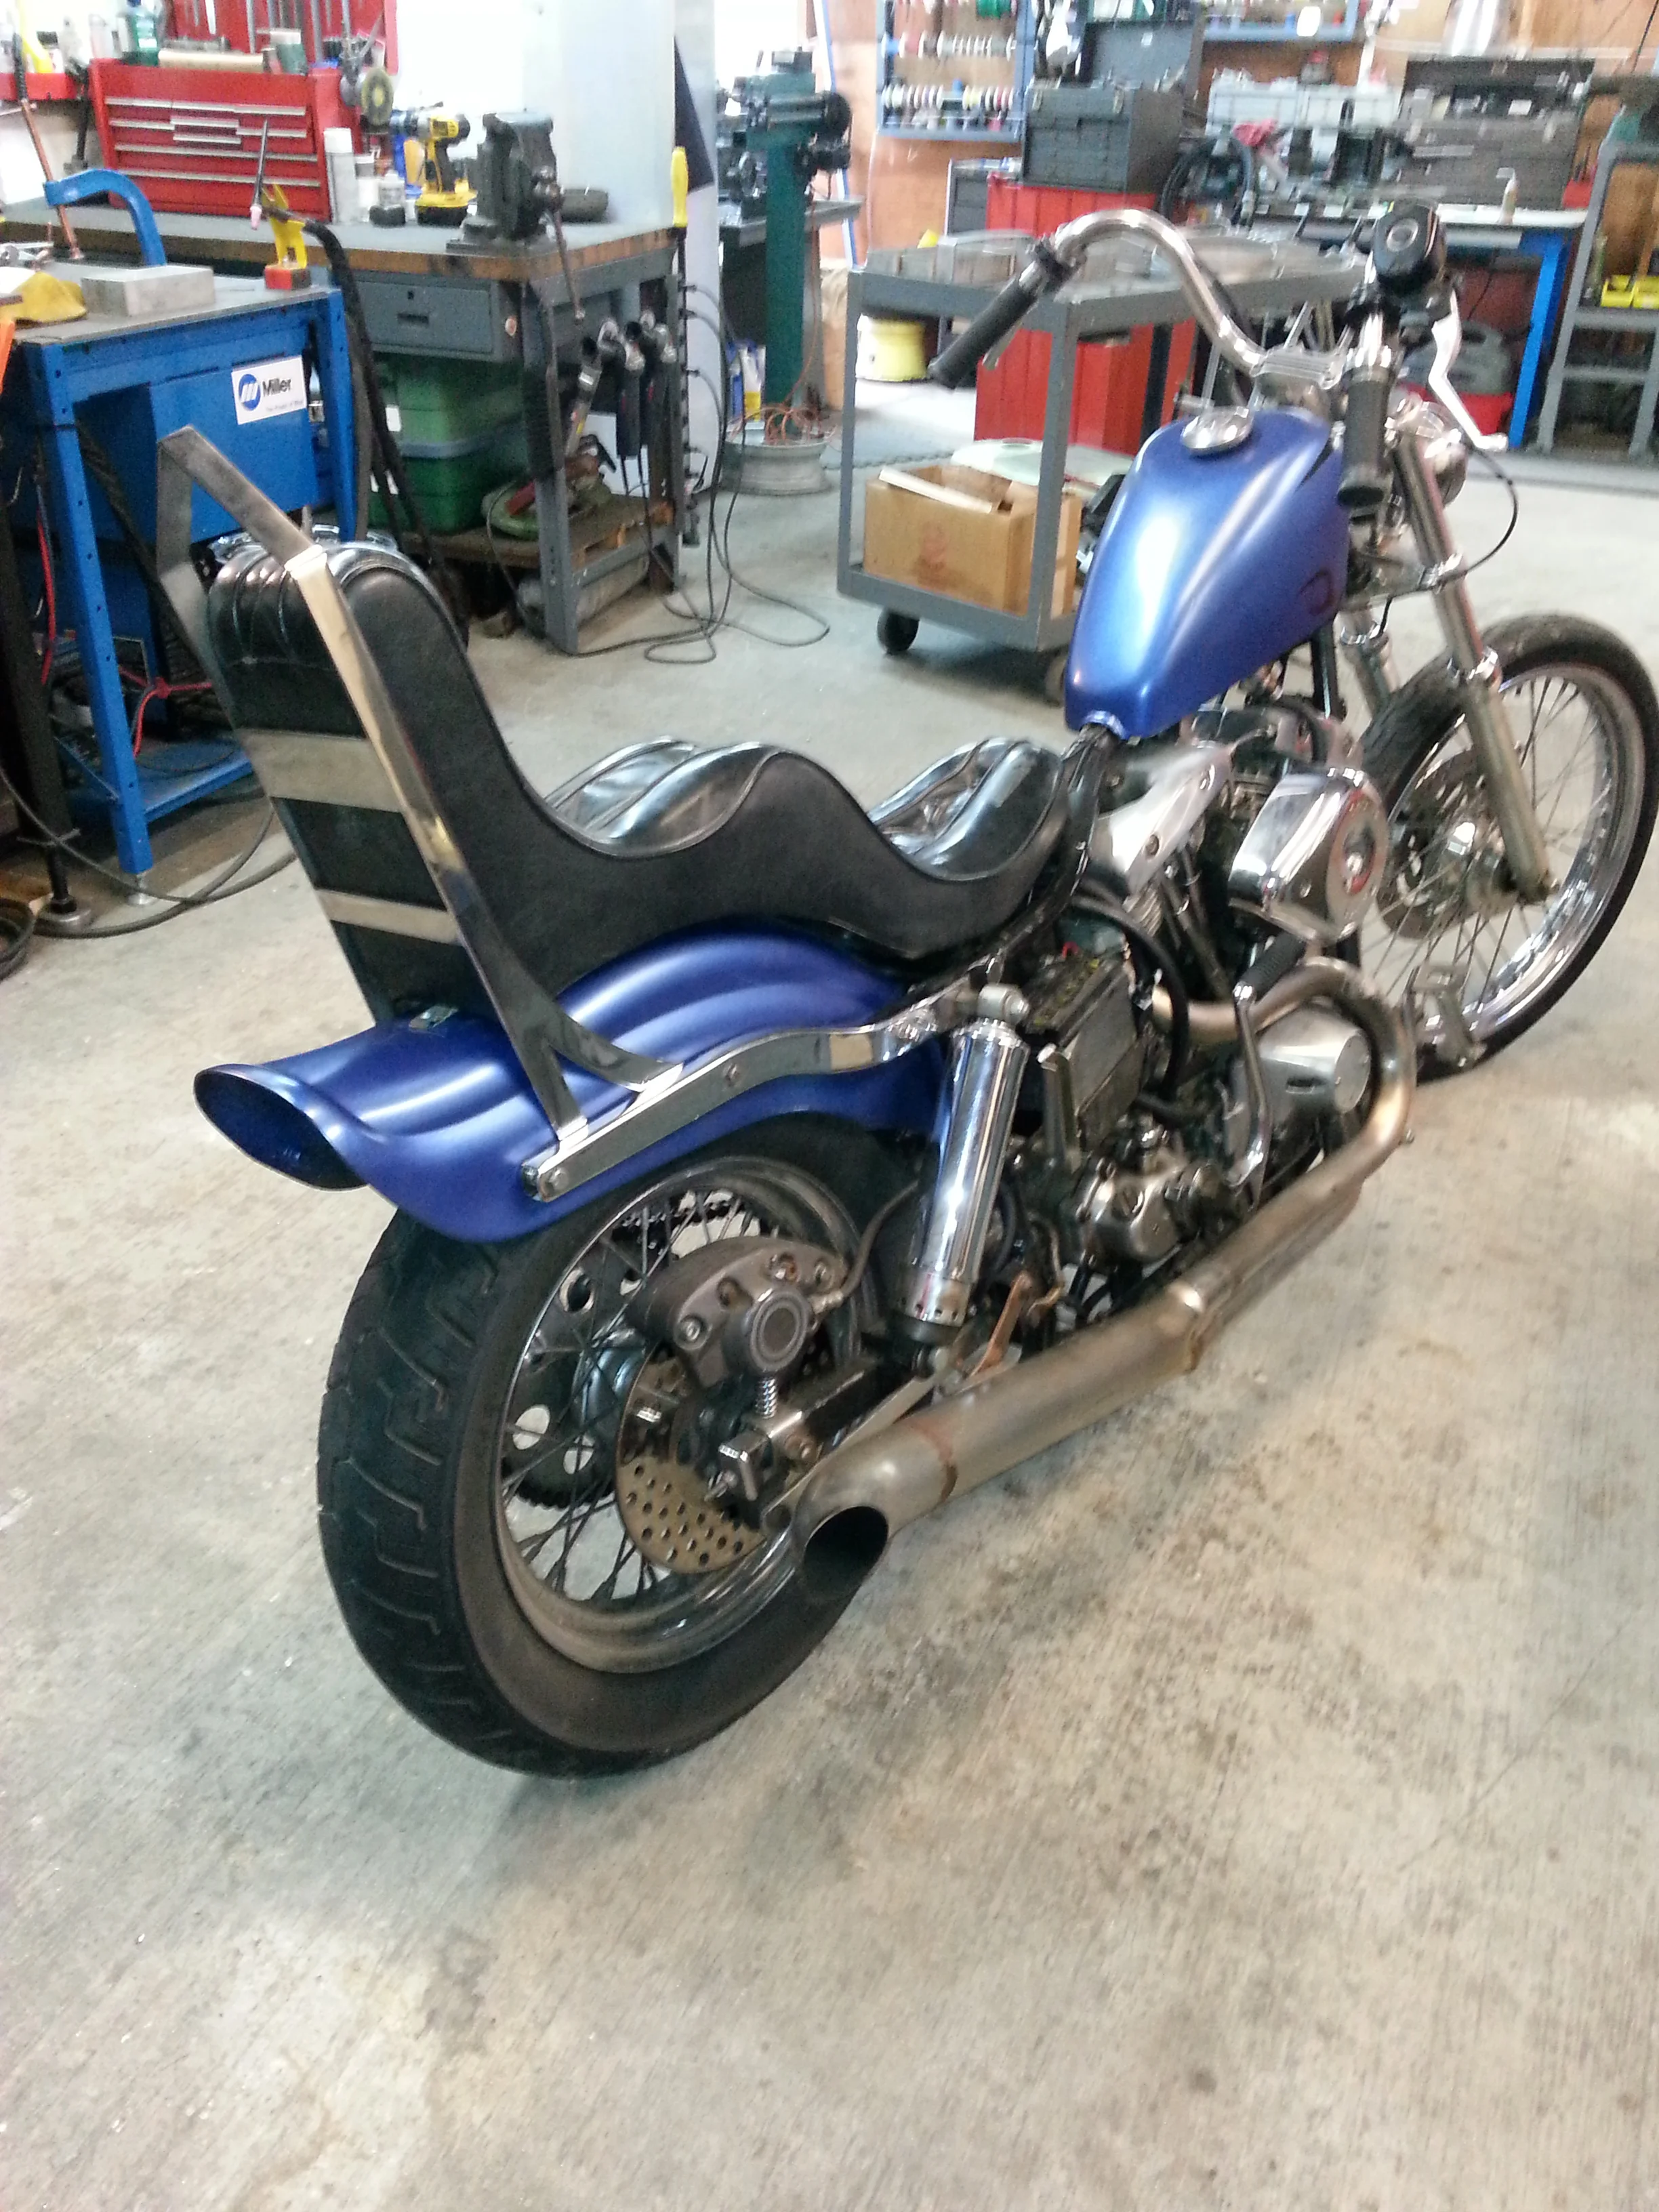
This customer wanted an old school sissy bar to fit the 60s-70s vibe of his HD Sportster. We decided to fabricate it with stainless steel flat bar and went with a very simple and clean design. Really happy with the look.
Part one of a two part ham radio antenna bracket, this piece bridges over a dormer roof to mount the antenna without drilling any holes in the roof itself, it also has a slip joint in the center to ease the installation process.
304 stainless steel Moxon Claw ham antenna bracket
This pretty little piece is machined out of bronze and stainless steel and is designed to attach a sailboat auto pilot arm to a steering
quadrant while also providing connection points for the rudder stops.
This is a through the wall grounding/connection plate made for a customer's Ham radio "shack". He really wanted the layout just right with just enough finger room for attaching cables, so I laid it out in CAD to ensure it was exactly to his liking. Once we had agreed on the layout it was just a matter of accurately drilling a bunch of holes in 0.125" copper plate.
This is a 5.6 Mini class dirt boat frame built for a local customer. The 5.6 Mini class is taking off in Europe and seems to be gaining steam here in the States with the world championships coming to Nevada next year. The frame was built as a prototype and did well on it's first runs in the Nevada desert.
This project is a good example of a small job that meant a lot to the customer. This coolant elbow is off of an older Perkins diesel in a French built boat. The customer had tried everywhere to find a new replacement part without any luck at all. So, I reproduced the part and the boat was back under way.
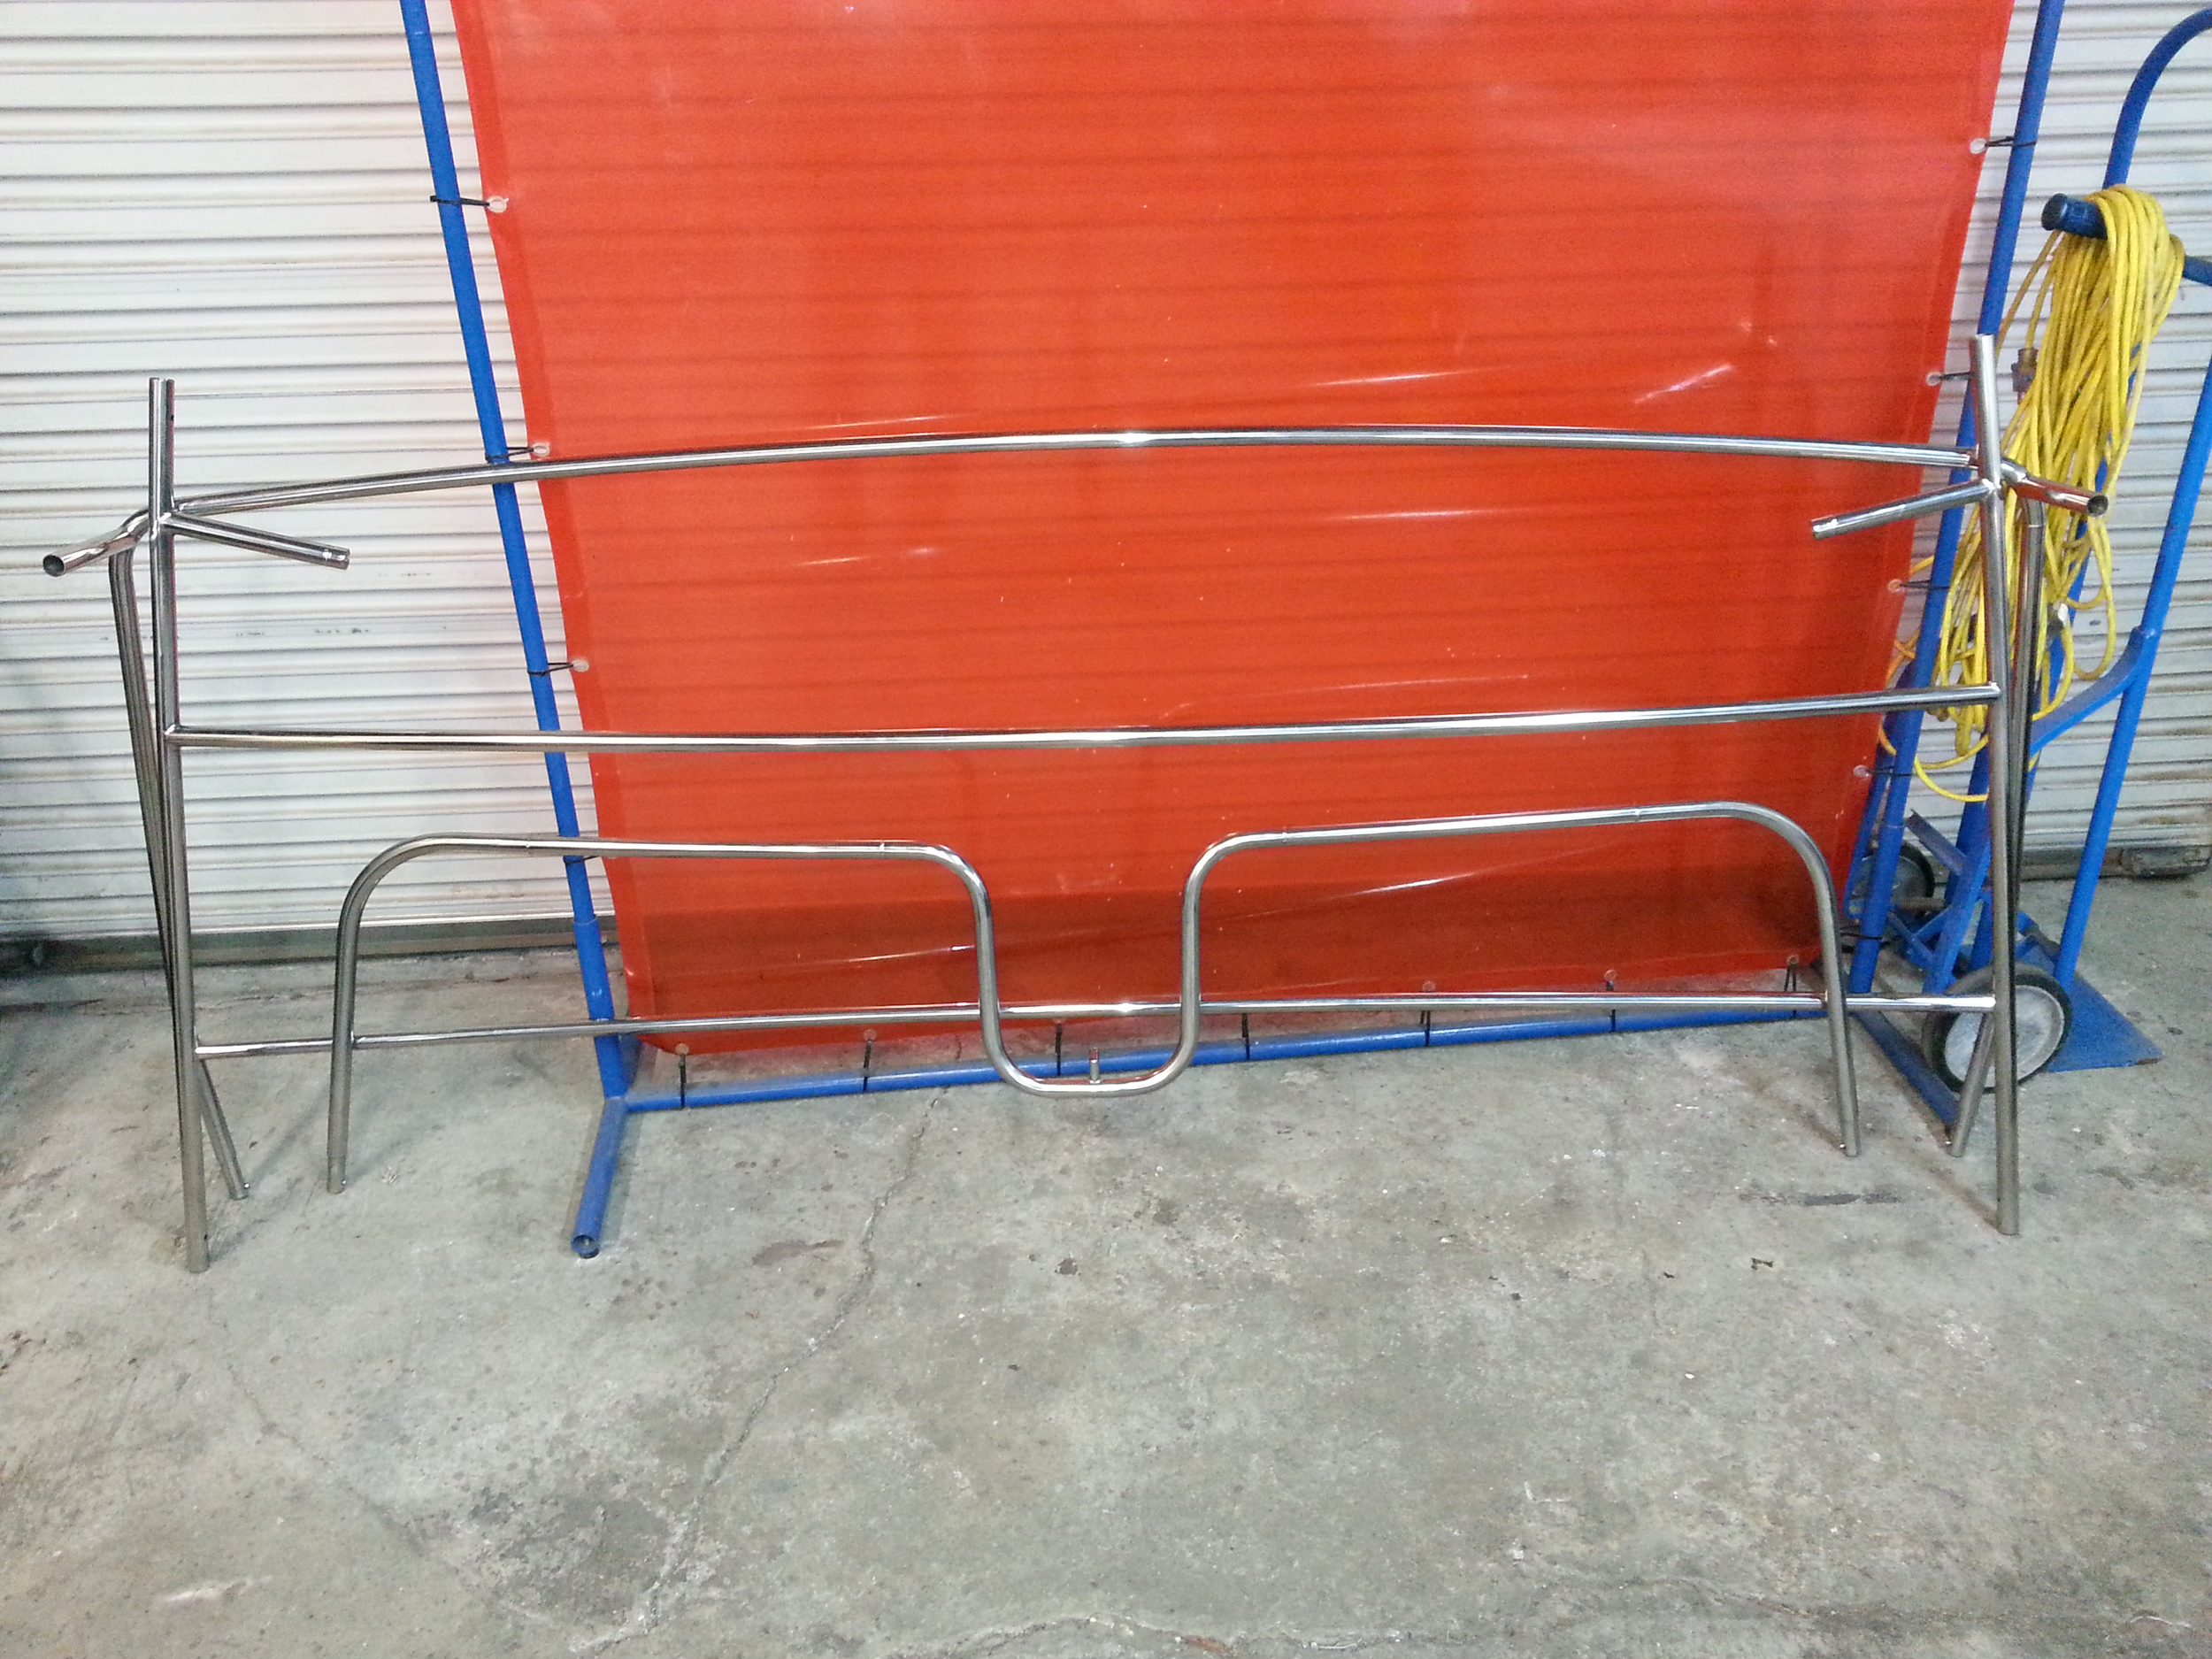
These sailboat self-steering windvane brackets are built out of thick wall stainless tubing, the two black pieces on the ends were made out of Delrin/acetal to provide galvanic isolation between the stainless brackets and the aluminum self-steering vane.
This was a fun project. It's a small "paper beater" used for making pulp to be used for handmade paper production. The job was to fabricate a new adjustable motor bracket and convert "the beater" to use 12 volts in order to make it truly portable. The owners travel giving talks and demonstrations on paper making and it's not practical for them to bring their larger equipment. There were also a few fixes to the bearings and axle arrangement that we're pretty straight forward. To use this machine you add water and the raw material, such as cloth, you wish to make the pulp from. When you turn the machine on the aluminum wheel spins in a bath of water crushing and pulverizing the material into pulp for paper production.
I do a lot of rail repairs at GSF. Many boat owners are not aware their damaged boat rails can be repaired rather than replaced. Of course there are limits to the amount and type of damage that can be repaired before it makes more sense to just start over with a new rail. Hopefully these pics will help to demonstrate what is possible.
A severely bent stern rail off a Catalina sailboat
The rail is mounted to the welding table with fixtures to ensure proper alignment. Then the bent portion of tubing is cut out of the rail. The cardboard template on the table indexes the rotation of the rail foot so the holes line up with the original holes in the boat.
Internal stainless steel sleeves are made and inserted into the tube at the weld joints, the tube is then TIG welded, and the welds are hand filed down and polished. The end result is a repair that is undetectable to the naked eye and stronger than the original piece. All done at a fraction of the cost of a building a new replacement rail.